Pages

Saturday, May 25, 2013

Gift Tag Challenge

Quilting Arts Magazine is sponsoring another challenge, this one for their seasonal "Gifts" issue which comes out in the fall.  Jane Davila brought it to our attention at a recent FANE meeting and encouraged us to take part in the challenge.  The idea is to create a fabric gift tag using one of the templates they supplied and one or more of the colors shown below, chosen by Jane herself.


They're kind of funky colors, very different from the traditional holiday colors.  I wasn't sure if I would have time to create anything before the deadline on the 31st, but the gift tags are only roughly 2"x 3 1/2" and I found myself with a little free time (and the itch to create something!) on a rainy Saturday afternoon, so I decided to go through my stash and see what I had that might fit the bill. 

I dug up this springy looking seersucker that had two of the colors in the pallete, and thought it would be fun to cut a Christmas tree shape out if it.   I had lots of snowy whites that could serve as the background. (Don't you just love a dotted Swiss?).

It was a cute idea, but then I remembered I had a large collection of buttons in that bright lime green.

After playing around with them, I came up with this:

I really like it!  It's not a unique idea (I've seen button trees like this before), but the lime green and pink color scheme makes it a little quirky and fun, don't you think?  I'll send it out to QA on Tuesday and maybe next time I find myself with the itch to create something quick and fun, I'll make some more that I'll really use on presents this Christmas (after the present is opened, it can be hung on the tree - two gifts in one!).

Sunday, May 19, 2013

Brightening a Dreary Day


My Mother's Day mixed bouquet is still going strong a week later and brightening a dull, rainy day.  Hope everyone's having a happy Sunday!

Thursday, May 16, 2013

Another Charm Break


Last week I packed up and mailed out my 25 charms for the Mermaid's Treasure swap.  I tried working those sliced shells into the charm, but thought it looked too cluttered.  I wanted to include them anyway, since they're so unusual and cool looking, so I dangled a little bead off one hole of the shell, put a jump ring on it and included it in the package as a second bonus charm.

Then I started thinking about the next charm for the bracelet Round Robin.  The theme of the bracelet I have now is Steampunk/Alchemy.  The journal she included with the bracelet was so cool, as you can see below.

Inside, her pages looked aged and were all decorated with gears and symbols as you can see.  Each page was really an envelope that had a folded, lined page tucked inside, for each recipient to write about the charm they created.  There was one for every month of the year.


The charms already on the bracelet included a tiny hand-stitched leather top hat, a pair of goggles with crystal lenses, and of course, a lot of gears, keys, and key holes.  I wanted to make something different from all of these, and her journal gave me the inspiration I needed.  I decided to make a tiny book with alchemical symbols for the pages!

To make this, I used whatever materials I had around the craft room.  I looked for a scrap of leather for the cover, but didn't have one, so I wrinkled up a piece of brown craft paper and painted it with acrylic paint.  I glued it to three pieces of cardboard, wrapped it around, and glued it neatly.  Then I decorated it with the symbol for gold and some pretend writing using a gold gel pen.


I cut, folded, and aged some pages using Distress Inks, then drew some symbols I found by doing a Google search for alchemy symbols.  I even rubbed the edges of the pages on a gold stamp pad to give it that gilded look.

I added two copper loops to keep it closed with a lobster claw clasp, which I hung from a chain attached to the jump ring along the spine. I also hung a key charm from the chain.  Here's the finished charm hanging on the bracelet with the other charms.  Isn't the whole bracelet so cool?  It has such a mysterious and fun aura about it - and it will still have 7 more charm added along the way!  These Round Robin bracelets are fun because you only need to make one charm, so you can spend some extra time on it and make it really special!

Thursday, May 9, 2013

Reliving Florence

We just managed to get all our photos in one place, so this week I had the chance to go through them, organize them a bit, and make some albums.  It's like living the trip all over again...


All our nights in Italy (except one) were spent in this lovely B&B on via Dante Alighieri.  We were given keys to the front door (isn't it funny how the doorknobs are in the center of the door?) and after walking up to the second floor, you arrived in the main sitting room, below.  A simple breakfast with breads, cakes, fruit, yogurt, coffee, and tea was available here every morning, and many guests met here in the evenings for the wifi, which couldn't be accessed in all the rooms.  Off of this room was another sunny sitting area and a balcony which looked out into the courtyard (see the next photo, below).


The ceilings at the Dei Mori were all covered in these lovely frescoes, dating back to the 15th century.  It was lovely to lie in bed in the morning and imagine who painted them and who else may have looked up at them over the years.

All the bedrooms were located down this short hall.  Notice the old brick archways.

The narrow cobblestone streets outside the Dei Mori look like this...

 and this.  It was easy to imagine Dante Alighieri, Giotto, the Medicis and other historic Florentines wandering down the lanes toward the Piazza della Signoria, only a few minutes away on foot.

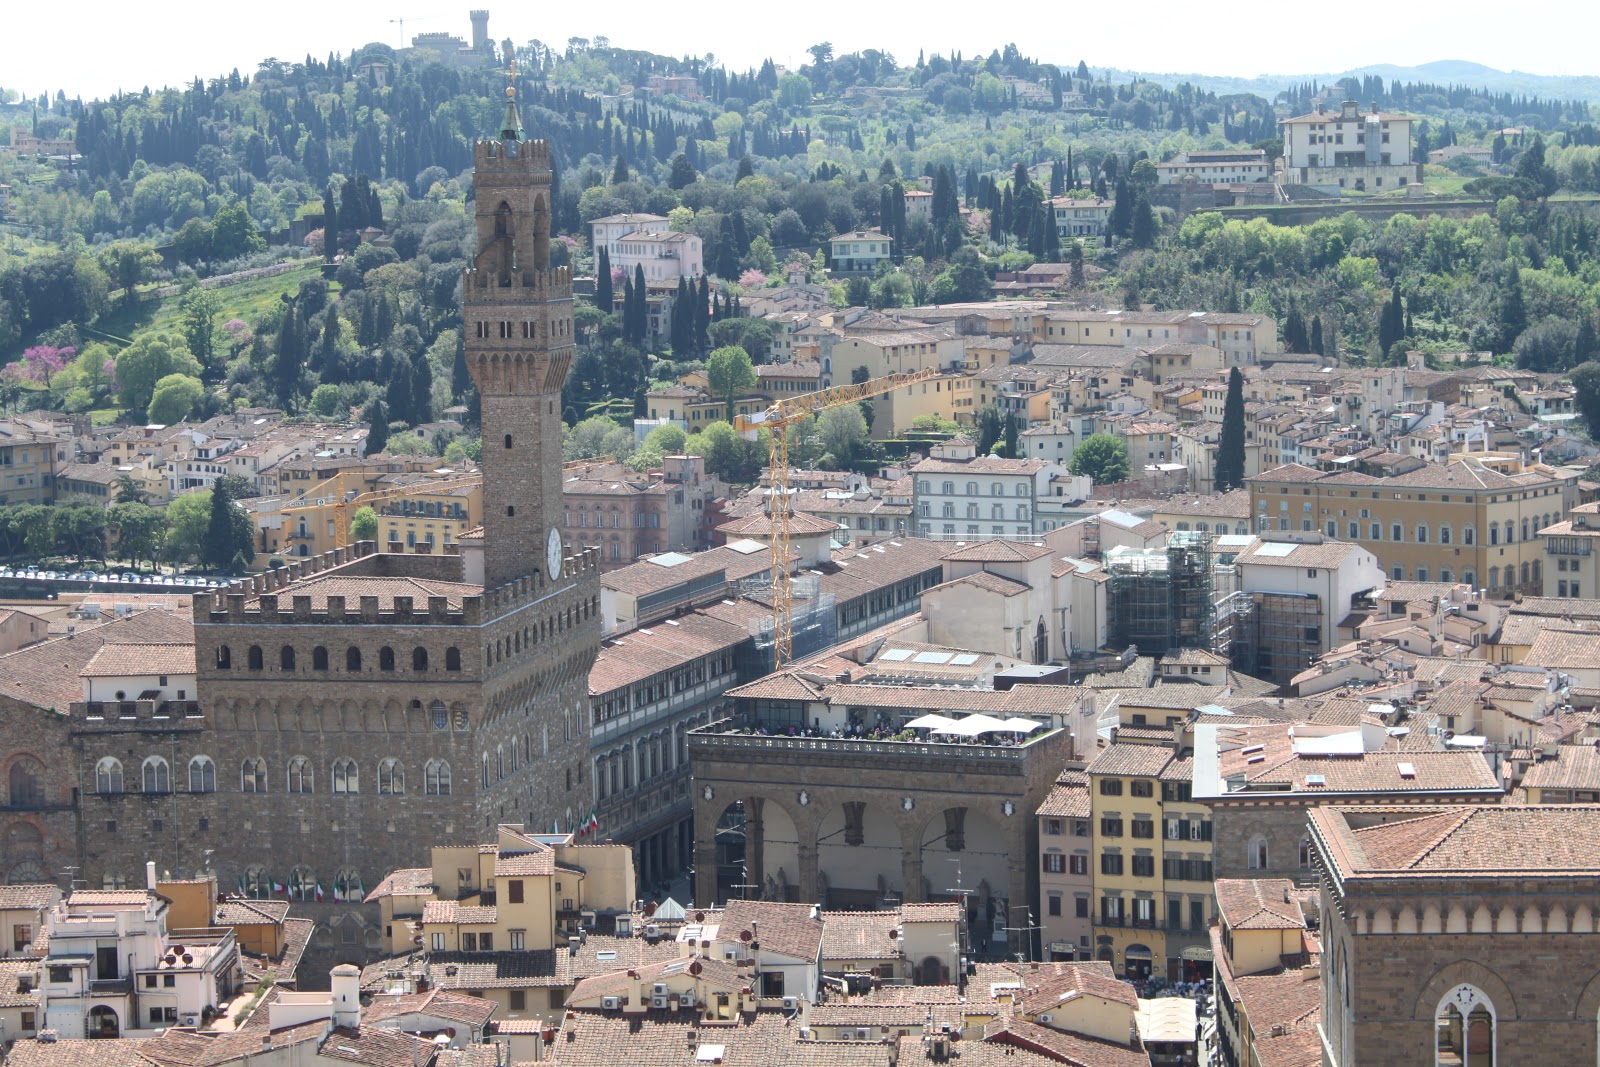
Perhaps Florence's most famous piazza, it is shown here from Giotto's famous campanile near the Duomo.  The large castle-like structure with the tower is the Palazzo Vecchio, where the city government met and where the Medicis lived at one time.  The famous Ufizzi Gallery museum housing many works by Botticelli, Leonardo Da Vinci, and Michelangelo, is also off this square.

Here I am, enjoying my first views of the Palazzo Vecchio and all the sculptures, tourists, and cafe`s that line the square.

One of the main attractions here is a copy of Michelangelo's David.  The original was situated here until the 1800s, when it was moved to the Accademia.  You're not allowed to photograph that one, so it's nice to be able to take home pics of this one, although it doesn't have quite the impact surrounded by all the brickwork and other distractions.

Mark loved seeing this balcony, which apparantly was in a scene in one of the "Hannibal the Cannibal" movies!

Beneath the Palazzo Vecchio is this lovely carved courtyard where you can wander (for free) and admire all the gorgeous details of the ceilings and columns.

There is also a replica of this Putto statue on a fountain (the original can be seen inside the palazzo), which is said to have been a favorite of Lorenzo Medici.  Isn't he cute?  It was amazing to be surrounded by all that fantastic artwork within such a short walk of the B&B!  I wonder what it's like to live there and see it on a daily basis!

Here we are having our first of many dinners near the street at a little trattoria.  We had bread with olive oil and herbs, fresh ravioli, risotto, and wine (what else?).  Salute!

Sunday, May 5, 2013

Kimono-Inspired Fiber Art


At the NSQG World of Quilts show this weekend, my FANE group exhibited our Kimono-inspired fiber art in one of the classrooms.  As you can see, they looked stunning displayed together in a group, with stands designed by Jane Davila and constructed by several group members last week.  While they all had the basic T-shape of a kimono, some were simple dyed or painted rectangles of fabric, while others included stitching, piecing, quilting and/or embellishments.  Once again, each one was unique and reflected the individual interpretation of the artist.  It was fun to wander around between them and listen to others as they commented on certain individual pieces and the collection as a whole.  They really made quite an impact!

These three are by Vivien Zepf, Carole Hoffman, and Cecelia Leiseroff.

This African-inspired piece by Donna Chambers was really stunning.

The three below are by Andrea Schedletsky, Natalya Aikens, and Norma Schlager.  Norma dyed her fabrics using shibori techniques and plans to use the central piece as a table runner after the show ends!


The two above are by Barbara Drillick and Barbara Sferra - beautiful!

Mine was one of the first that caught your eye entering the room.  Once again, I was pleased with the upbeat color combination, texture, and movement of the piece.  I got many favorable comments from other group members; it's always nice to get a bit of positive reinforcement!

Below is one of my favorites by Nike Cutsumpas.  It's very soft and simple, but also crisp, clean and elegant.

Here are a couple more shots with art by Joanne Lubchenko, Carolyn Spiegel, Joyce Sullivan, and Nancy Mirman.  We are looking for another venue to exhibit these again sometime in the near future.


Friday, May 3, 2013

Another Charm Interlude


When I signed up for the "Mermaid's Treasure" charm swap last month, I knew it would be tight timewise, with our momentous trip to Florence in the middle.  I knew I had a stash of potential materials and before we left, I played around with a few ideas like this one and the one above.  I've had those sliced shells for a long time and since I need to make 26 of these, I thought that might me an unusual and simple solution. 

But after thinking about it, I realized I wanted to try getting an actual mermaid into the charm somehow.  I decided to try playing around with using my Shrinky Dinks for Inkjet printers.  I've tried if before and the big trick seems to be lightening the colors of the original picture enough so that when the plastic shrinks and the colors darken, they won't be too dark.  

So I started with a line drawing of a mermaid.  I traced it onto another sheet of paper and colored it in using Inktense watercolor pencils, then scanned it into my laptop.

From there, I lightened it considerably, then put it into a word document, shrank it down, and fit nine onto a page.  This is how they looked printed onto the shrink film.

Then I washed some blue acrylic ink over the back side, cut them into ovals, and punched a hole at the top.  Straight out of the oven, the surface has no shine, so I added a small jewel and then put on a layer of Mod Podge's Dimensional Magic.  Here is a sample, front and back.  Pretty neat, huh?  The color is not exactly what the original was, but it works pretty well!  Now I can send 26 copies of my miniturized original art out into the world for other charm collectors to enjoy!