Pages

Sunday, June 30, 2013

How does my garden grow?


Here's an updated shot of progress in the garden.  It's been so exciting adding elements and watching it all develop!  Last Saturday, my DH and I trekked over to Lowe's and found some great bargains - that metal archway, which makes such a nice entry, a cement bench, some large ceramic pots, and several plants that grow well in shady areas.  Everything was priced too low to pass up and I kind of went a little nuts!  My favorite part and the centerpiece of it all is this:

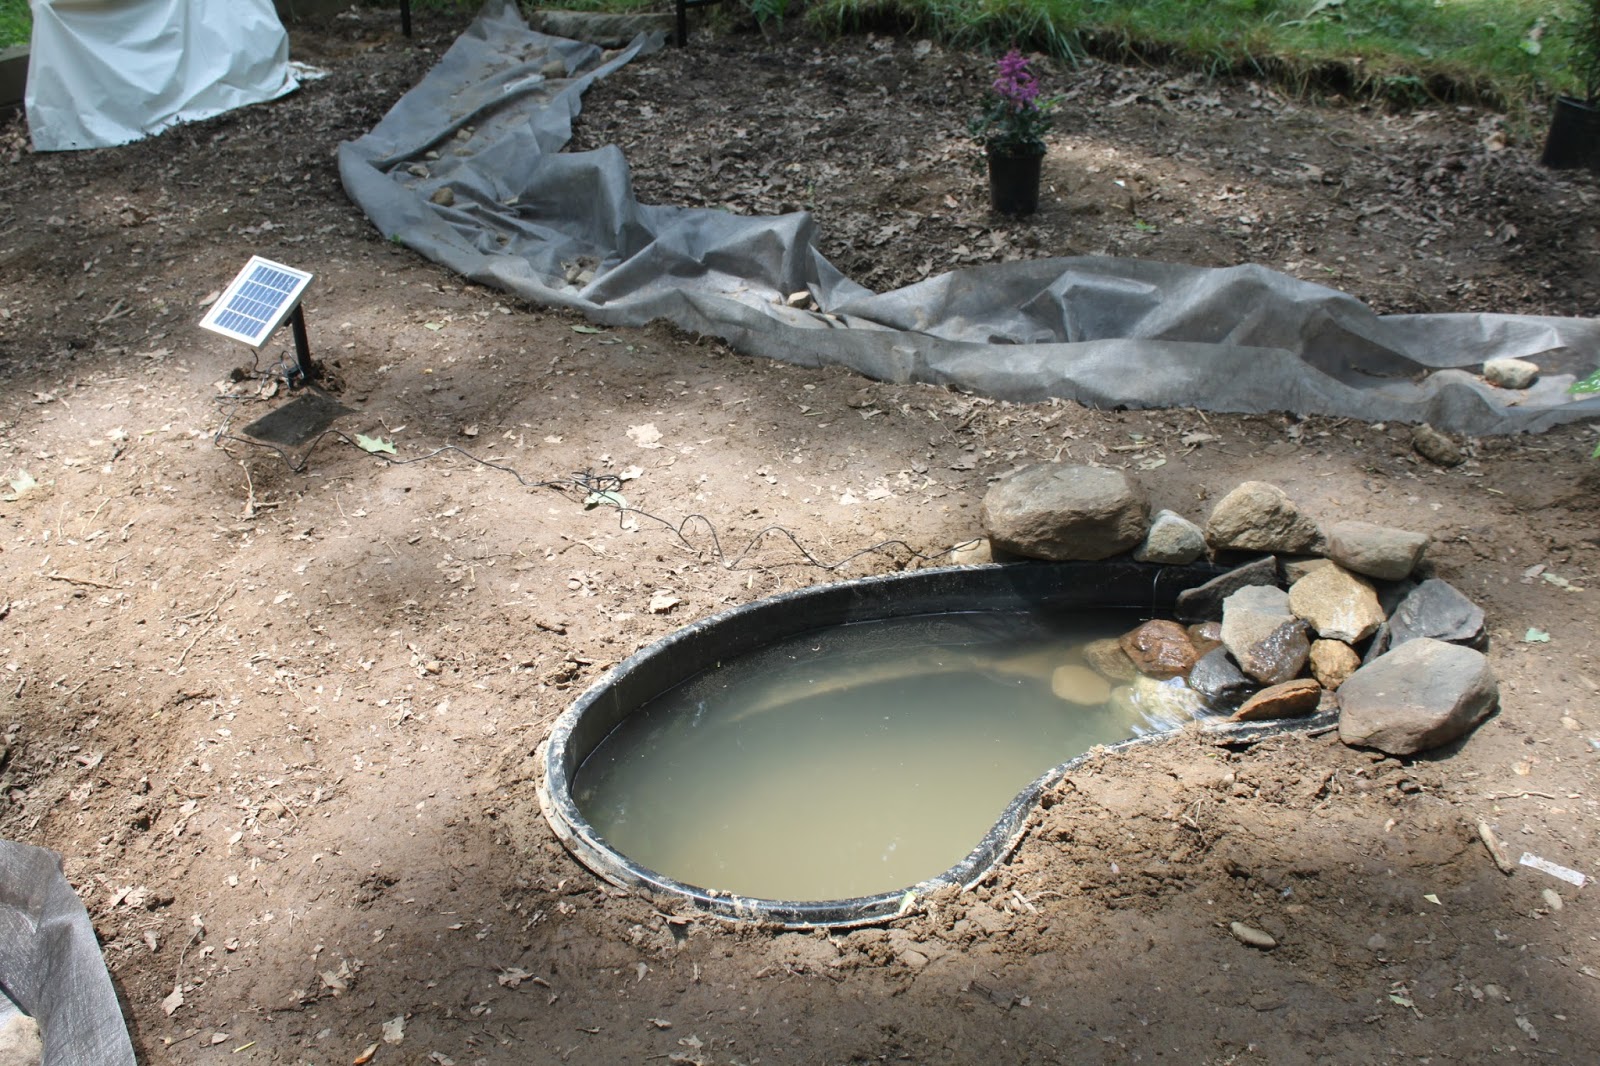
... my very own pond!  Ever since we moved here, I've thought about putting a pond somewhere, so this is like a dream come true!  At first, I thought it would be too difficult and had settled on just having a large ceramic pot filled with water with a water lily growing in it.  After pricing the pots (they are EXPENSIVE!), I looked for other options.  This little 50-gallon pond was perfect!  We spent the better part of this past week digging out the hole, and now we're arranging rocks around the edges.  I really wanted the sound of trickling water as well, but wasn't sure if that would be possible with no electricity nearby.  I was able to make it happen with a little (very affordable) submersible solar powered pump I ordered from Amazon.com.  There seems to be enough direct sunlight down there, and this has a rechargeable battery back-up and an on-off switch, so it doesn't have to be running all the time.   I tried to create a little waterfall which you can just make it out in the picture below.  It really looks and sounds just the way I hoped!  The entire pond and pump cost less than $150 - not bad for a dream come true!


Not too far away, we'll have our little cement bench to sit on and this tilted pot with lobelia spilling out of it.

We also picked up some of these lovely caladia.  This one has great color and does well in the shade.  Can't wait to get them all in the ground!

The large trunks of these tulip trees are on the border of the garden.  We decided to incorporate them into the design by making this the "fairy garden" area.  There are perfect spots near the ground for little fairy  house doors and I have hopes for adding whimsical little lights and things among the low-growing plants here.  I have so many ideas and plans, but I'm trying not to get ahead of myself.  In the coming week we hope to get the plants in the ground and the pebbles into the lined pathways.  We can add more plants and decorations as time goes on.  If it looks really good by mid August, maybe I'll have a "Garden Grand Opening" and invite some friends over to see it!

Friday, June 21, 2013

Celebrating Summer


The first day of summer!  It's always been one of my favorite days of the year.  It's such a great feeling to open your eyes on that morning, take a deep breath, and savor the anticipation of long sunny days ahead, without alarm clocks, school buses, homework, or tests until September!  My youngest got off the bus with a big grin on her face yesterday.  The other two finished their tests earlier in the week so we've been hosting sleepovers and hot-tub parties, and making numerous trips to the movie theater and back again.  They have a few weeks of unstructured fun time before camp (and my summer library programs) start up again on July 8th.

We've had perfect weather here all week with bright clear blue skies, lots of puffy clouds floating through on the breeze, and cool comfortable evenings and nights.

Our yard is showing off all it's summer colors, from our very vigorous climbing rose (don't you just love a climbing red rose on a white fence?)...


...the the wild daisies which have sprung up here and there in the yard, and the small sweet strawberries ripening near the front lawn.

Yesterday I finally dug our little froggy birdbath fountain out of the shed and put him in his spot on the lawn (he cleverly covers the well pipe that sticks up there!).  He makes me smile every time I see him!

Other signs that summer is here: this box of winter hats and gloves has been stashed appropriately in the closet...

...and our favorite roomy beach carryall has taken it's place!  I try to keep it packed with towels, a beach blanket, and sunscreen so it's ready at a moment's notice.

I'm still working away at the new garden below in our yard, slowly carving up the space into planting beds which will be separated by a pebbled path and maybe some stepping stones.  I hope to get down there tomorrow to finish the path and maybe we can get some pebbles to fill it next week.  I also have a big "focal point" in the works, but I'll save that for another post.  I'm really excited about it and hope it all comes together as I've imagined!

For now, I'm going to take a little breather, have some lunch on the back deck, maybe chill out in the shade with a good book and a glass of lemonade, and listen to the gentle sound of my latest deck-oration:

- this charming seahorse fountain my husband found at the home improvement store.  Isn't he cute?  He'd be great in the new garden, but he's electric and there's no outlet that far away from the house.  I wonder if there are solar powered outlets (and whether we get enough sun down there to power one)?  Anyway, he partially hides the wiring for the hot tub and brings a little whimsy to the deck!

Happy first day of summer!

Wednesday, June 19, 2013

Playing with Prints


This summer, the theme of the library's summer reading program is "Dig into Reading," so my coworkers and I have been dreaming up some appropriate arts and crafts activities.  This week, I played around with some printing ideas using supplies from the grocery store:  styrofoam trays and sliced vegetables.  Above are my practice pieces.  The process is easy enough for even primary grade students.

First, I made a printing plate using a rectangular styrofoam tray from the grocery store.  If you've never done this, it's simple - Start with a well-washed tray (or even a round disposable styrofoam dish).  Cut away the sides of the tray so you have a completely flat surface.  Then draw a design onto the flat styrofoam using a ball point pen, making nice deep grooves.  A simple design works best.  Using a foam brush, paint right over your design plate with a thin layer of paint.  Place paint-side down on a piece of paper (or fabric) and press firmly.  Pull the painted styrofoam away gently to reveal your print.  Of course, it will be the reverse of your original, so you may want to avoid using words (unless you can write backwards!).

Besides "digging" into the styrofoam tray, we used vegetables to make a border design around the styrofoam print.  Can you tell which ones I used?  The round yellow and orange flowers were made with sliced corn on the cob and the magenta centers are from slice jalepeno peppers!  The green "leaves" are from a celery stalk and the large magenta "rosettes" are from the whole head of celery, sliced.  Sliced okra also makes a nice flower-shaped print, which I intend to get when we actually hold the class next month.

These came out so nice, now I want to try it again on fabric and add some stitched or fused details!

Saturday, June 15, 2013

Adding Determination and Plain ol' Hard Work


Last weekend we cajoled our girls to pitch in for about an hour to pull weeds in our new garden and I was amazed that we were able to get the whole area cleared.  We had laid one of those black cloth-like weed barriers beneath the wood chips when we first built the playground area, so that all had to be pulled up as well.  Most of the chips have decomposed into a nice top soil, but last fall's leaves are still there, so the area was a mixture of both of those, plus tough Putnam County clay and rock as well as old sandbox sand.  One good thing: there are tons of earth worms, even those huge "night crawlers," as thick as my fingers!

Today was a beautiful dry day, and not too hot, so I spent a little time down there filling buckets with sandbox sand and distributing it to areas that had more clay, moving leaves to the sandy areas, and stirring in some good soil from an old compost pile.  But I knew if I had to mix all this in by hand, well enough to plant a healthy garden, it would probably take me weeks.  The area is roughly 30'x 30' - really a good size!  There had to be a better way...

Luckily, there was!  We bought this tiller years ago and have gotten good use out of it, but it hasn't been in running condition for a while.  Thank goodness Mark is handy and was able to tinker with it this afternoon (with a little help from Youtube) and got it up and running again!  Yay!

In under an hour, he was able to go through the whole area twice, mixing all the leaves, sand and clay into a nice homogeneous mixture and aerating everything really well.  The soil looks dark and loamy, perfect for a lush shade garden, and now it will be fairly easy planting.   But before we do that, we have to decide where the paths will be, lay down new weed barrier there, and cover them with gravel.   We may pull up the existing wood frame too, so we can make the shape a little more natural and organic.  I think it's going to be great...  Cassie is already making herself comfortable there, as you can see!  I can't wait to get a bench, maybe an obelisk for climbers, a whimsical statue or two, and maybe a water feature...

Sunday, June 9, 2013

Cultivating Patience and Hope

We've lived in this house for 17 years and there are still long lists of projects we've wanted to complete and haven't, for one reason or another.  Life just seems to trip along day by day, and before you know it, you have 3 kids, a part-time job, a goldern retriever puppy, and a creative hobby, all which require time and energy, which are in limited quantities.  This summer, my DH and I have committed to making a more concerted effort on some of those projects, beginning with our yard.

I'm usually so busy keeping up with the indoor spring cleaning that I don't get out into the garden early enough in the spring.  By the time I do, things are already hopelessly overgrown and I make every effort to keep up, but it always seems to overpower me.  This year, I've been doing a little bit of work each day (mostly while I'm out with the dog), so I've managed to get a good start and stay on top of things.  We have about 3/4 of an acre of sloping land that backs onto a small lake.  It's very wooded in the back and a real challenge to keep up with the vines, weeds, and volunteer trees that come up every year.

I started with an easy project, filling these pots with flowers to brighten up this area between our window and door on the deck.

To the left of the window there's a big bare spot that has needed something for years.  I recently found this inexpensive trellis to lean agains the wall, to support a climbing vine.  I planted some morning glories in the box planters, but they don't seem to be getting enough sun in that spot.  So I dug up a couple of clematis from another location, and put them here to see how they'll do.  I need to get two more of the trellises to cover the areas on either side of this one.  I love climbing vines and the look of our deck would be much improved by some greenery.


Directly below our deck there's a steep hill.  When we moved in, it was covered with grass, but was impossible to mow.  I've been slowly replacing the grass with easy care plants like day lilies and ground-cover roses, but lately have been trying to cover the majority of the hill with English ivy.  Over the last few years, I've clipped pieces from other locations and transplanted them on the hill.  I have to balance the rate of pulling weeds with the growth of the ivy so the hill doesn't get washed away in the rain.


 It's finally starting to look like I'm making progress here, but it's slow growing.  I'm hoping that by the end of the summer, it will filled in a good deal more.  We may add a small retaining wall to border the bottom of this hill and the path down to the lower yard.


On other slopes, I've been transplanting pachysandra.  I'm looking forward to these spreading and filling in too!  It will look so much better than the weeds that constantly sprout up.

At least this second hill is beginning to really fill in.   I planted ferns here a few years ago and they are finally spreading to cover the hillside.  I love the lush look of ferns in the shade.  We may eventually put some stone steps down this hill among the ferns.

Towards one side of this hill, I recently cut down a small choke cherry tree and planted this red maple.  It can handle the shade back here and looks so much more graceful than the ugly cherry.  I'd love to put a statue or something near here, and plan to add some lily of the valley and other ground covers below.

The flattest area of the backyard currently looks like this:
We had a wooden playset for the girls here, which we've taken down, but this area has been pretty much abandoned for several years.  My DH was going to pull out the edging and turn it back into lawn, but I suggested we turn it into a shade garden.  The surface was covered with wood chips and leaves, which have decayed into a very nice top soil, so we may as well take advantage of that.  I find myself coming down here with the dog a couple of times a day, all year long, and I've been longing for a bench to sit on and a better view.  If we work together on the weekends, I hope we can make great strides towards turning this into a peaceful and lovely backyard escape.  Patience and hope:  two essential ingredients for a successful garden!

Friday, June 7, 2013

"It's raining on prom night..."


Isn't that a song from the musical "Grease"?  The weather here over the last few weeks has been swinging back and forth between hot summer weather and chilly wet weather.  Today, unfortunately is another very wet day.   I know the flowers appreciate it, except for maybe these very sad looking poppies!


 But it's prom night and my baby is all dressed up for her first prom!  She's not a senior, but was asked by this polite young gentleman below, soon to be in the Navy.  He obviously has good taste and asked her in a very romantic way, with a big bouquet of flowers and a little poem that he wrote just for the occasion.  How could we say no?  I'm sure they'll have a great time, despite the predicted downpours!  Doesn't she look ready for the red carpet?

Sunday, June 2, 2013

New Furniture!


If you've been reading my blog for a while, you may remember that just about a year ago, I cleaned up and reorganized my creative space.  I had a serious case of the "wanties" for the Martha Stewart craft furniture pictured above, but managed to get pretty neat and organized with what I had.  Well, on Mother's Day, we were visiting with my sister-in-law on Long Island who has a lovely and spacious ranch-style home with a HUGE finished basement.  She had recently purchased TWO of the craft tables shown above as well as the storage piece behind it with the wrapping paper hutch.  My DH must've seen the longing (bordering on jealousy!) in my eyes and decided he wanted me to have some smart new craft furniture.  He found it on sale with free shipping, and the next thing I knew, it had arrived!  This past week he spent a good bit of time assembling it all and now HERE IT IS!


It looks clean and sharp, even in my small work space!

The table has two shallow drawers that are perfect for some of the flatter items I have to store, like bead organizers, wire tools, and shrink film supplies.  The larger piece has two shallow drawers, the top one with all these adjustable dividers!  Wow, I can't wait to start filling it up!

Here's how the room looks now.  I'll need to get a stool, since the table is much higher than the previous folding table I was using.  And I think I'd better get cracking and straighten up the sewing area again - next to those two clean, white spaces, it looks pretty messy!  I'll get to that later this week.

Meanwhile, thanks a million, honey!  What a fantastic gift!