Pages

Showing posts with label WIP. Show all posts

Monday, August 22, 2016

Filling the Well

Yesterday I was fortunate to have a good reason to wander around one of my favorite museums, the Metropolitan Museum of Art.  I haven't been in a few years, but my daughter has a summer art assignment, so we spent the afternoon among all the awe-inspiring works.  I saw some things I don't remember seeing before, and visited some of my old favorites.

Among these were the European sculptures and paintings.  When you head to that wing, you walk through the hallway with all the Rodin sculptures.  This one, depicting Adam after the fall, is so powerful in it's tormented strength, agony, and despair.  


After being amazed by the emotions expressed by Rodin in bronze, I headed into the Impressionist rooms and absorbed the grace and peacefulness of the Monets, relaxing into the soft reflections and soothing pastels.


Then I was uplifted by the playfulness and beauty of the Renoirs and Degas.


 Finally, I stood rapt in front of the van Goghs.  The intensity and passion behind those thousands of flickering brushstrokes make his paintings almost shimmer.  It's hard to tell in these photos, but the skies and backgrounds are filled with dashed swirling brushstrokes that make the paintings come alive.  I'm more astounded every time I see them.  His subject matter is often so ordinary - a cypress tree, two browned and drying sunflower heads, a pair of old, worn shoes.  But they're treated with such love and care that they become extraordinary through the filter of his brush and paint.


This one below was my favorite this time.  Again, such simple subject matter - an ordinary family, a farmer at work in the garden in spring, a child taking her first steps.  The passion and emotion expressed in the father's open arms, the child's delight in this great accomplishment, the beauty of the light shimmering on the trees and making their cottage glow.  All of this conveyed without facial expressions but with simple gestures and postures and the soft dreamlike colors.  Just breathtaking.


After being sufficiently awed by van Gogh, I headed down to see some American art.  I was particularly interested in seeing the collection of Tiffany glass after having just read Clara and Mr. Tiffany by Susan Vreeland.  This historical fiction novel is the story of Clara Driscoll and her female coworkers who worked in a division of Tiffany studios, designing and creating many of the extraordinary windows and lamps but never given much credit.

The windows are displayed beautifully, lighted from behind, and it was great to get close up to see all the different types of glass used.  Tiffany had a glass factory in Queens, NY, where large sheets of glass were made in different colors and special effects were achieved by mixing and swirling colors, make some with striations, swirls, blotches, and other textures to resemble tree bark, water, rocks, and mountains.  Sometimes pieces of glass were layered to get just the right effect.


According to the book, Clara Driscoll came up for the idea to make lampshades out of stained glass.  Nature was a huge source of inspiration for her and she made lamps with dragonflies, butterflies, and a variety of flowers.  This is her water lily lamp, with the stems cascading down into a froth of blossoms that seems to float at the bottom.  Having an irregular edge like that was very time consuming to create.  And the bases were sculptures in themselves to coordinate with the theme of the shade - this one depicts lily pads.  Brilliant!

Here's another window, with iris and flowering dogwoods.  Spectacular!

Tiffany also had men who created fantastic vases and goblets by blowing colored glass.  This one is called the Peacock vase because of the feather motif on the fan-like top of the vase (it's difficult to see in this photo, because it was lit from behind and you're not allowed to use a flash).  It's amazing to think that the artist started with a lump of hot colored glass and was able to achieve those very fine feathery lines to resemble a peacock feather and work it into such a graceful, delicate shape.  And it's all attributed to Louis Comfort Tiffany, although he wasn't really the one doing the work!


One part of the museum that I visited for the first time was the furnishings of the American wing.  I wandered through rooms and rooms decorated in various styles depicting different time periods, from early colonial up through the civil war and into the 20th century.  Much of it was very ornate and heavy, with velvet and lace draperies, dark, heavy carved furniture upholstered in dark velvets.  It seemed very stuffy and uncomfortable to me.  Then I came upon the Frank Lloyd Wright room.


I never really understood the appeal of all those straight lines and spare furnishings until I saw it in comparison to the clutter of the previous rooms.  It literally seemed like a breath of fresh air, with the clear light coming through the many windows, the use of natural stone and warm (but not dark) wood.  Now I get it!

So now that I've filled my creative well, I've made some good progress on my own simple art.  I've selected all the book parts, decided on their placement, and glued or fused them all down.  I've even done a bit of hand stitching.   I like that the piece is made up of squares and rectangles, which references a quilt, although I've used paper.  It looks very architectural, and as I was working on it, I felt like I was building it, using the rectangular spines as columns and text pages as blocks.  I've stitched some lines to indicate windowpanes and the door is the hard cover of an old Reader's Digest Anthology titled "Getting the Most Out of Life."  The steps leading up to the door are titled "Making a Habit of Success" and "Improving Your IQ."


I made a point of selecting titles, words, and a few images that depict the importance and value of the written word, storytelling, libraries, and their importance in a democratic society.  Here are a couple of close-up shots of the stitching and some of the textual details.


I think I'll need to pick up some more pearl cotton in bright colors to hold all the pieces firmly in place and highlight certain things.  I figure I'll keep stitching until I think it's done or until September 8th, whichever comes first!

Saturday, February 6, 2016

My First Fiber Fall Chain!


It may not seem like a big deal, but I feel like I've been working towards making this chain in teeny tiny steps forward and it's so nice to finally see it come together!  As you know if you read this blog (anyone out there besides Norma and Vivien?), I started making 5" squares like the one on the bottom - one at a time, and kinda slow, with hand-stitched embellishments.  Then I went to the January FANE meeting and saw some of the techniques some of the other ladies are using (like cutting up a previously made, not-my-favorite-good-for-repurposing quilt) and started thinking about how I could streamline the process of making these small shapes.  

I began painting and stitching an old placemat with the plan to layer it with Timtex, stitch it, and cut it up.  That seemed to take me a month to get done (lost the thread, cleaned my studio, got distracted with the white lace piece yada, yada, yada) but I finally finished that this week and decided to cut them into 3" squares.  They look better than I thought they would, as you can see below.  But it only made about 12 squares and I knew that wouldn't be enough, so I came up with another idea to make 4" squares.

One of the talented women in the group loves to experiment and she had beautiful, delicate results layering dryer sheets and strengthening and coloring them with tinted acrylic gel medium.  I had this very light webby fabric that feels very much like dryer sheets but is already a pale blue, so I decided to try a similar technique.  I made a sandwich with the thin blue web on the outside and put some pieces of lace and angelina fibers on the inside with some bonash powder (a fusible in granular form). 

After fusing, it was stable enough to stitch and also print on, but was still very thin and wispy, so I painted it with a diluted gel medium.  My gel medium is matte and I was a little disappointed with the results, which kind of obscured the shine of the angelina and the detail of the lace.  I debated starting over with the last piece of that blue webbing that I have, but decided to muddle through with this one.  (These things will only hang in the NSQG show for one weekend - they don't need to be perfect!).  I added some more stitching, this time with metallic thread, and then painted on a layer of glossy Mod Podge (over which I sprinkled a little clear glitter).   After it dried, it looked like this:


Still not very exciting, but I decided to go with it and cut them up into 4" squares.


Funny thing, when they're cut up and held up to the light, they look much better!   They really do seem to capture the feeling of Air, which is what I was going for.  All three sizes of squares have the same spiral element tying them together, as well as the common colors and threads.  With the 10 or so pieces I've chained together on the diagonal, they do bring air and wind to mind.  I used pieces of a sheer ribbon stitched to the corners to link them and they turn quite a bit as they hang.  I'm happy with the results and will feel confident to have them hanging amid all the other beautiful work my fellow FANEers have made!  I only need to make two more 5" squares and I'll have enough to make an 8' chain.

(Then I just have to make two more chains...)

Friday, January 22, 2016

Progress in the Studio


In the past week, I've managed to spend some time in my studio, continuing with the clean up and also doing a little creative work.  Above you can see the fabric storage boxes all fronted with coordinating construction paper.  I'm amazed at how much neater the whole shelf looks and so sorry I lived with it looking messy for so long!

One of the issues I have in the studio is the works-in-progress that sometimes turn into UFOs.  I don't want to put them away because then I'll never finish them, so they end up sitting out, making the room look messy.  I've rearranged and repurposed some containers to corral them, so they're within easy reach but still look fairly neat.  Here are two examples, the basket on the right with journaling materials and the one on the left with my "summer blues" project, still unfinished!


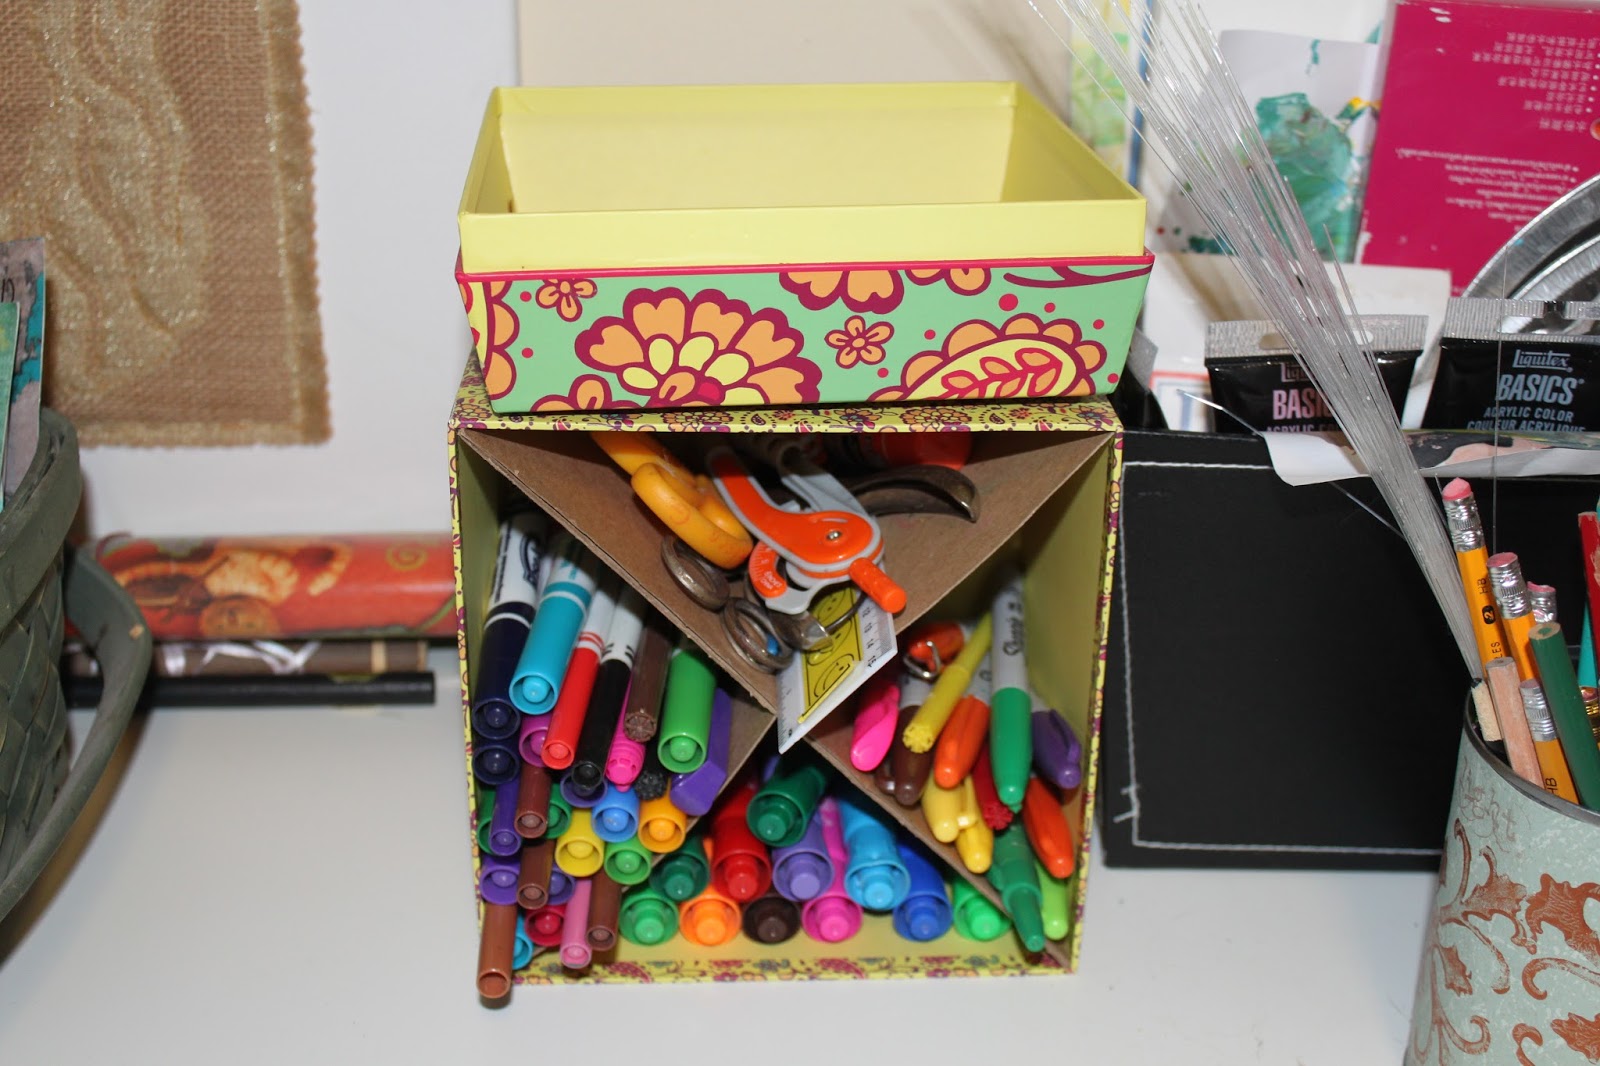
A dear friend gave me this container, below, with a plant inside.  I love the colorful print, but couldn't find a way to use it.

I decided to turn it on it's side, insert cardboard crosspieces inside, and use it for marker storage!  I put the lid on top to serve as a catchall for all those little odds-n-ends that are always turning up.  The marker/pen/pencil storage was one of the eyesores in the studio, so this looks a lot better!

So here's a full shot of the wall you see when you walk into the studio area - much neater, right?  I bought several natural containers at Michael's last week (at 50% off!) and used those to corral the projects and unify the look.  I also moved my collection of back issues of Quilting Arts and Cloth Paper Scissors magazines here, because they also look neat and orderly (I think I'm almost ready to get rid of them entirely...).  The girls art materials are to the right of the tabletop and readily accessible if the creative mood ever strikes them.  The whole space looks much more inviting!

So in the course of organizing and going through bins, I came across this roll of burlap, which is
4 1/2" wide.  It thought it was the perfect size for making some squares for the "Fiber Fall" project, so I dug into my aqua scraps and stitched a couple.  It's really fun just arranging the scraps together to please myself, not worrying about the outcome, just enjoying the process and playing with the materials.  But again, if I keep making the shapes (which have to be 2-sided!) in this fashion, it will take me until May to complete the project.  Which is okay, but aren't there other things I'd like to do?

As a matter of fact, as I was working on the squares, I also had in the back of my mind a call for entries at the Mahopac Public Library for an art exhibit with the title "Lace."  At first, I thought I could kill two birds with one stone and make one of my Fiber Fall pieces out of lace, but then I realized that the projects are all due in April.  So I decided to play around with lace squares anyway, and have already made almost a complete nine patch.  Here are six of them, below.  Again, I'm enjoying just layering on all my white and lacy scraps to see what arrangement I like best, then stitching it all together.  It did occur to me as I was working that the nine squares together resemble a window, and then I got to thinking about how the windows in my home growing up used to frost over on very cold mornings when moisture got between the casements.  My window faced east and sometimes the winter sun would shine through it, refracting the light and creating dazzling designs.  So I decided to add some subtle color with sheer scraps in pale yellow, blue, and rose.  I'm moving through this project fairly quickly, but now the worktable is once again covered with scraps (notice I didn't share that in the studio photos!).  I've been putting in a little time down there in the mornings and evenings, and leaving everything out, although messy, allows me to pick it up even for just a few minutes.


So the year is starting off well, creatively!  Hope your January has also been enjoyable :)

Wednesday, January 6, 2016

Playtime Progress


My friend Vivien has a point, with her comment on my last post:  if I keep working with the level of detail I used in the first two components, it will take me until May to get the whole thing finished!  So in the interest of time (as well as recycling and experimentation), I decided to try another approach.  When I've made multiple small pieces before, as for swaps, I've made a large piece (painted, stamped, stitched, whatever) and then cut it up into smaller pieces.  I thought I might have to do most of these components in that way, then do some with more detail and individuality, the way I did with the first two.  

So I dug around in my box of white fabric and found these 12"x18" jacquard placemats I put in there several years ago when I was cleaning out table linens I didn't really use.  I like the floral texture that's woven into the fabric and thought it might be nice altered in some way.  I used Dy-na-flow acrylic paints by Jacquard (which are concentrated and act a lot like inks) to add bits of color here and there, then stamped with a swirl stamp I made from craft foam.  I like the results so far, but may fuse some bits of fabric onto it before I layer it, stitch it, and cut it up.  I have 6 or 8 placemats, so I'll do something similar for the back of this section.


Over the weekend, I played with some more weaving of fabric strips, this time in shades of brown.  This might possibly be a component in one of my Fiberfall strings, if I stick with the Earth, Air, and Water themes.

Even though these seem like small steps and hardly worth blogging about, at least I've been getting down into my creative space for a short time almost daily for the last week, to putter around, doodle, clean up, do some mending, or work on something like the above.  It's only the first week of the year, but so far, so good!  How has your first week of 2016 been?

Friday, January 1, 2016

Happy New Year!


I thought I'd start off the year on a positive note and write an entry for my poor, neglected blog!  This fall, I was feeling like I needed to put fewer demands on myself and do less rather than more, hence the two-month hiatus.  Of course, things got busy here between Halloween, Thanksgiving, Advent, and Christmas, and now that all the baking, shopping, decorating, hosting, eating, and celebrating are done, it's a good time to take a few moments to catch up.

Above is the piece I was working on in the fall, which I finished sometime in November.  I decided the woven painted pieces had a watery feel to them, what with all the ripples and circles, so I appliqued some solid waterlily shapes on top.  They look like they're floating, so I think that's what I'll call it.   I enjoyed this technique of slicing up painted, stamped or dyed fabrics and weaving them together.  It makes for a very unique background.  I'd like to try using it more.   Here's a close up:
 

And now on to the next project!  The FANE has been planning ahead for our group exhibit at the NSQG's annual show in May.  We wanted to do another 3-D kind of display and after much discussion, came up with the idea of stringing together some small shapes to make an 8-foot-long piece.  Each member is to make three of these, made up of basic shapes between 3 and 5" square (but they can also be circles or diamonds) connected by a short (2" or less) piece of yarn or ribbon.  We chose the name "FiberFall" for the exhibit.  I like the sound of that!

This is the ideal project to be done as a daily exercise, or at least, in small blocks of time.  I decided to get a head start on it the other day and made my first shape, below.  I still had a bunch of blue fabrics out from my "Summer Blues" WIP so I grabbed some of them and came up with this:

As usual, it took longer than you would think, mostly because the metallic thread I used kept breaking and I had to try several things (change the needle, adjust the tension, rethread the machine, rethread the bobbin) before everything went smoothly.  Then I hand stitched on the wire spiral in the center.  These pieces have to be seen from both sides, so the back looks just like the front.  It's a start!  I'm thinking I may create pieces to fit into the themes of Earth, Air, and Water (I always like to have a theme!).  And since I'm starting off the new year with ambition and gusto (cough, cough) I made another one this morning!  I think I'll hang these on the diagonal for greater movement and interest.


Even though I haven't done much blogging, I have been reading.   As a matter of fact, I am the new facilitator of one of the adult fiction book clubs at the library, so now it's my job to read!  This past fall we read The Passion of Artemisia by Susan Vreeland, North River by Pete Hamill, and The Storied Life of A.J. Fikry by Gabrielle Zevin (one of my favorites).  This month we will be discussing The Invention of Wings by Sue Monk Kidd (I read this last summer and loved it).  I also picked up Big Magic: Creative Living Beyond Fear by Elizabeth Gilbert (author of Eat, Pray, Love).  We can all use a little creative inspiration for the new year, and this book has gotten very good reviews.  But it's already overdue on my library card so I'd better get cracking!


How have you started off your new year?


Monday, October 26, 2015

A Few Things...


This month I've been working on some UFOs that have been hanging out in drawers and on worktables in my creative space.  The library has some display space on the second floor and they've asked me and a few other creative staff members to display some work in November and December.  I only need a few pieces, but most things have already been on display there in the FANE shows, so I wanted to choose a few things they haven't seen yet.  The above piece was made for a traveling SAQA exhibit a few years ago and I received it back recently.  It needed a frame or border, so I covered a stiff piece of interfacing with the upholstery fabric you see above.  Now it's suitable for display!

I also (finally!) finished the Thanksgiving-themed piece I created last year, below.  I had done all the embroidery but wasn't sure what to mount it on.  I found the plaid binding among my stash and decided the colors were just right.  Also now suitable for display.


Here's a close-up:

I've also revisited the "Summer Blues" piece I started in the summer.  I wanted to experiment with some other surface-design techniques on a few small (9"x9") pieces of fabric and the results are below.  I used acrylic paint to do some monoprinting, as well as using some stamps and stencils.  I wanted to keep the palate to the blues and white with a touch of yellow and green.  The results were okay, maybe a little busy or messy.

I decided to do a third when I came across this blue tie-dye look fabric in my stash.  Here, I simply stamped circles in a three sizes with white acrylic paint.

While handling the fabrics, I noticed the reverse of the first two were also kind of interesting, maybe even better than the front.

Finally, I cut the fabrics into strips of various widths and wove them together on top of some fusible webbing.  I used all three altered fabrics, plus some strips wrong-side-up of the first two.  This is what it looked like:

I like it much better than the each piece alone!  Some other FANE group members have been using this weaving technique for a years and I've always wanted to try it.  Now that I can see what the appeal is, I'd like to experiment with it some more.  But first I need to figure out what to put on top of this and how (or if) it fits into the larger "summer blues" piece.

Finally, I've been doing other fall things, like baking!  I recently came across a "candy corn cake" design somewhere on the web (maybe Pinterest?) and decided to try it myself.  Here' my version, made with pumpkin spice cake and cream cheese frosting. (See how each piece resembles a candy corn when sliced? Isn't that fun?)  And delicious! Yum!


Friday, October 9, 2015

Where does the time go?


I haven't posted on my blog in about a month!  It's hard to believe that summer is long gone and the  fall weather is here!  So where has the time gone?  We managed to get away for an extended weekend in mid-September (to Utah to visit family), the preschool and elementary programming at the library is in full swing, and the girls are back at school, so I guess all the busyness has made time fly.  Since I finished "Bamboo Grove" last month, my creative projects have been on the back burner, and I am just starting to get back in the groove lately.

Yesterday I created this Halloween door decoration (it's technically not a wreath) out of what I think is a felt placemat, some cute sticky-backed felt spooky shapes, a few laser-cut painted wood phrases, a pipe-cleaner spider, and some sheer orange ribbon.  I got most of the supplies at Michael's yesterday, and I'm pleased with the colorful and fun result!  I try to hang something seasonal on the door every month and I have used, re-used and maybe abused my previous October/November wreath over and over.  It was time for an update.  But I do continue to rehang this felt banner the girls and I created years ago.  We traced cookie cutter shapes onto felt for some of the ghosts, bats, and cats, then cut them out with scissors.  I think it's retained its charm and whimsy (although it certainly could use a pressing!).


A short article in the April-May issue of Quilting Arts magazine titled "Stitch and Discharge" by Mary Ruzich inspired me to try discharging with Softscrub with bleach.  At first, I tried regular bleach out of the bottle, but it's so watery and thin that there is very little control.  I actually painted the Softscrub directly onto this piece of denim with a paintbrush in this design and look at the results! (Now my daughters are getting all kinds of ideas about decorating their jeans!)  In the article, the fabric is layered and quilted first, then she discharges the raised quilted area.  I experimented with stamps, with okay results - not great, but not totally ineffective.  Probably larger, less detailed stamps would work best.  I haven't tried stencils, but I bet they would have great results.


I'll have to play with this technique some more.  It would make a nice addition to my "Summer Blues" WIP which is still hanging out on my design wall.  The other day, I revisited it and actually stitched a few pieces together.  It was originally going to be 18"x36" to fit into the FANE group show currently at The View in Old Forge, NY, but now I can make it any size I like, which is changing my thought process and throwing me off a bit.  Maybe I should just continue to think of the 18"x36" size.


I'm not as motivated to work on this as I was in the summer (seeing as there's now no deadline!) but I'm trying to stick to "showing up at the page" at least a few times a week, if I can't do it daily.  It's so much easier and more relaxing to just crack open a book!

Anyway, that's where the time's gone! 

Friday, July 17, 2015

Small Steps

 This week, despite a very busy schedule at the library, I've managed to spend a few minutes here and there playing with my supplies.  The other day, I stitched this little sun on a sky-printed fabric.

And this morning, I stopped into Michael's just to wander around and see what I could find.  I picked up this set of clear acrylic alphabet stamps, some PITT pens (one large one in white), and a new mixed-media journal.  When I got home, I started to play!


For some reason, when I placed this photo onto the batik ripple-print fabric below, the words ". . . life is but a dream"from "Row, row, row your boat" popped into my head and I knew I wanted to stamp or print them on there somehow.  The acrylic stamps I got were perfect!  I didn't mount them on blocks, but just cut them apart and painted the letters with white acrylic paint.  I must say, I'm very pleased with the results - it's the exact feel I was going for.  

I had also sketched a rowboat, which I traced onto the fabric using a light box and an air-soluble marker.  Then I painted in the boat, leaving the fabric below to act as an outline, so the boat looks almost translucent and kind of dreamy, like a memory.  I'm not sure yet how I'll stitch on the fabric photo; I'm mulling over the various options.

 Here's a close-up of the boat.  I'm really happy with how it turned out.

I think this all ties into my feelings about summer in general.  I'm probably not the only one who looks back with great fondness on the summers of childhood.  So as I'm exploring what summer means to me, different images and colors are floating up to the surface of my mind and memory.  I'll just keep going with it and see where it takes me...