Pages

Showing posts with label totem. Show all posts

Friday, June 6, 2014

Made it (Sort of...)


I made the deadline for the "Summer ARTiculated" show at the OSilas Galllery at Concordia College, although not with a new piece.  Even though I wanted to create something new, I found myself unable to push myself and went with "Mother Nature's Summer Tunic," from last year's FANE kimono challenge, and the "Sea Horse Trio," the totem from the challenge in 2012.  Here are the photos I submitted:


I'm glad that at least I made the effort to submit; As Wayne Gretsky once said, "You always miss 100% of the shots you don't take."

Monday, June 25, 2012

Renga Layer Added

Now that my studio is all clean and tidy, I had time to dig out some acrylic paint and add a layer onto the fabric I received in our FANE group Renga.  I went with my original idea, which was to echo the circles Carolyn already started using silver paint.  I dipped cans of various sizes into the paint to print the circles in a random way.  I had to really stop myself from going overboard, as two more people will have to add more layers on top of this.  I hope I succeeded!  Here's a close-up of one section.  The inks Carolyn used have a little bit of glimmer to them, so I think the silver works well with that and the original color scheme.  On July 12th, I get to pass this onto the next person in the group, I receive another piece that already has two layers on it, and I get to see how my piece of fabric is progressing!

Also, in the process of cleaning and finishing up miscellaneous projects, I finally hung my totem!  We have a high ceiling in the entryway which is really the only place it will fit, so I coaxed my Dear Husband up on a ladder and he kindly hung it for me.  Here are a couple of shots so you can see how it looks:
 There is other art in the entryway, some of it mine, some created by the girls, so it's a good spot for it.  In this shot I'm standing in the living room near the piano, so it's visible from there.  I wonder what people coming to the house will say about it...

Sunday, May 6, 2012

Totem Exhibit at World of Quilts

My FiberArts Northeast group had a special exhibit of our "totem" pieces at the Northern Star Quilter's Guild's annual World of Quilts show this weekend.  We hung our "Spirit Flags" in the hallway to attract attention to the classroom where the 8' long pieces were hung.
 As you turn into the room, this is the first glimpse you get.  That first piece, made all of various circles of fabric stitched together, really catches your eye with all its color and movement.  The artist, Andrea Schedletsky, titled it "Still Circling."
 Then you walk into the room and between all these lovely columns of color.  Each one was a work of art and further evidence of our group's outstandingly talented members!  Front and center of the picture below is Nike Cutsumpas' piece and to the left of that is Joyce Sullivan's "Creatures of the Sea and Land and Sky."
Below is a close-up of Nike's, which was made with lace paper as well as fabric.  It was one of my favorites.
 Barbara Drillick, who created the colorful abstract piece below, used window screening as the main background of the piece.  She painted other pieces of a screen-like material, cut them in geometric shapes, and artfully arranged and stitched them in place.  It's so fun and different, I just love it.  Behind that is a tropical piece by Ann Louise Lyman.  She also made use of sheers for a portion of it.  And to the right in the background is Cecelia Leiseroff's colorful totem, on which she fused paper she had collographed.
Below, you see pieces by Nancy Mirman (left) and Claire Oehler (right).  They are both very experienced quilters and took a similar approach to the 8-foot length by dividing it up into sections.  Nancy likes to use unusual found objects, as seen by the pressed leaves she used on a subdued silk background, while Claire chose more traditional appliqued blocks and bright cotton fabrics.  Both were stunning to see.
 In the foreground on the right is Natalya Aiken's piece.  She often uses architectural elements in her pieces and chose windows for her totem.  She used a lot of recycled materials like dryer sheets as well as gold foil or paint, which is why it's so reflective in this shot.  In the background you can see Kathi Jahnke's piece which also incorporated windows.
Here is another shot of Kathi's windows.  I love the colors and the way they turn independently.  Another totally unique approach!

 Here is a shot of the other side of Natalya's piece.  I should've taken some close-up shots of hers.  As usual, the detail and workmanship were gorgeous.
 Vivien Zepf chose a more political theme for her piece.  I love the traditional red, white, and blue color scheme in combination with the block piecing and the text.  It was hard to get a shot of the back of hers, which was also striking.  You can see a piece of it by clicking here.
This is an underwater-themed piece created by Norma Schlager.  I love the way she used two 8-foot long sections and hung them back-to-back so the fish on the other piece look like they're swimming in the distance.
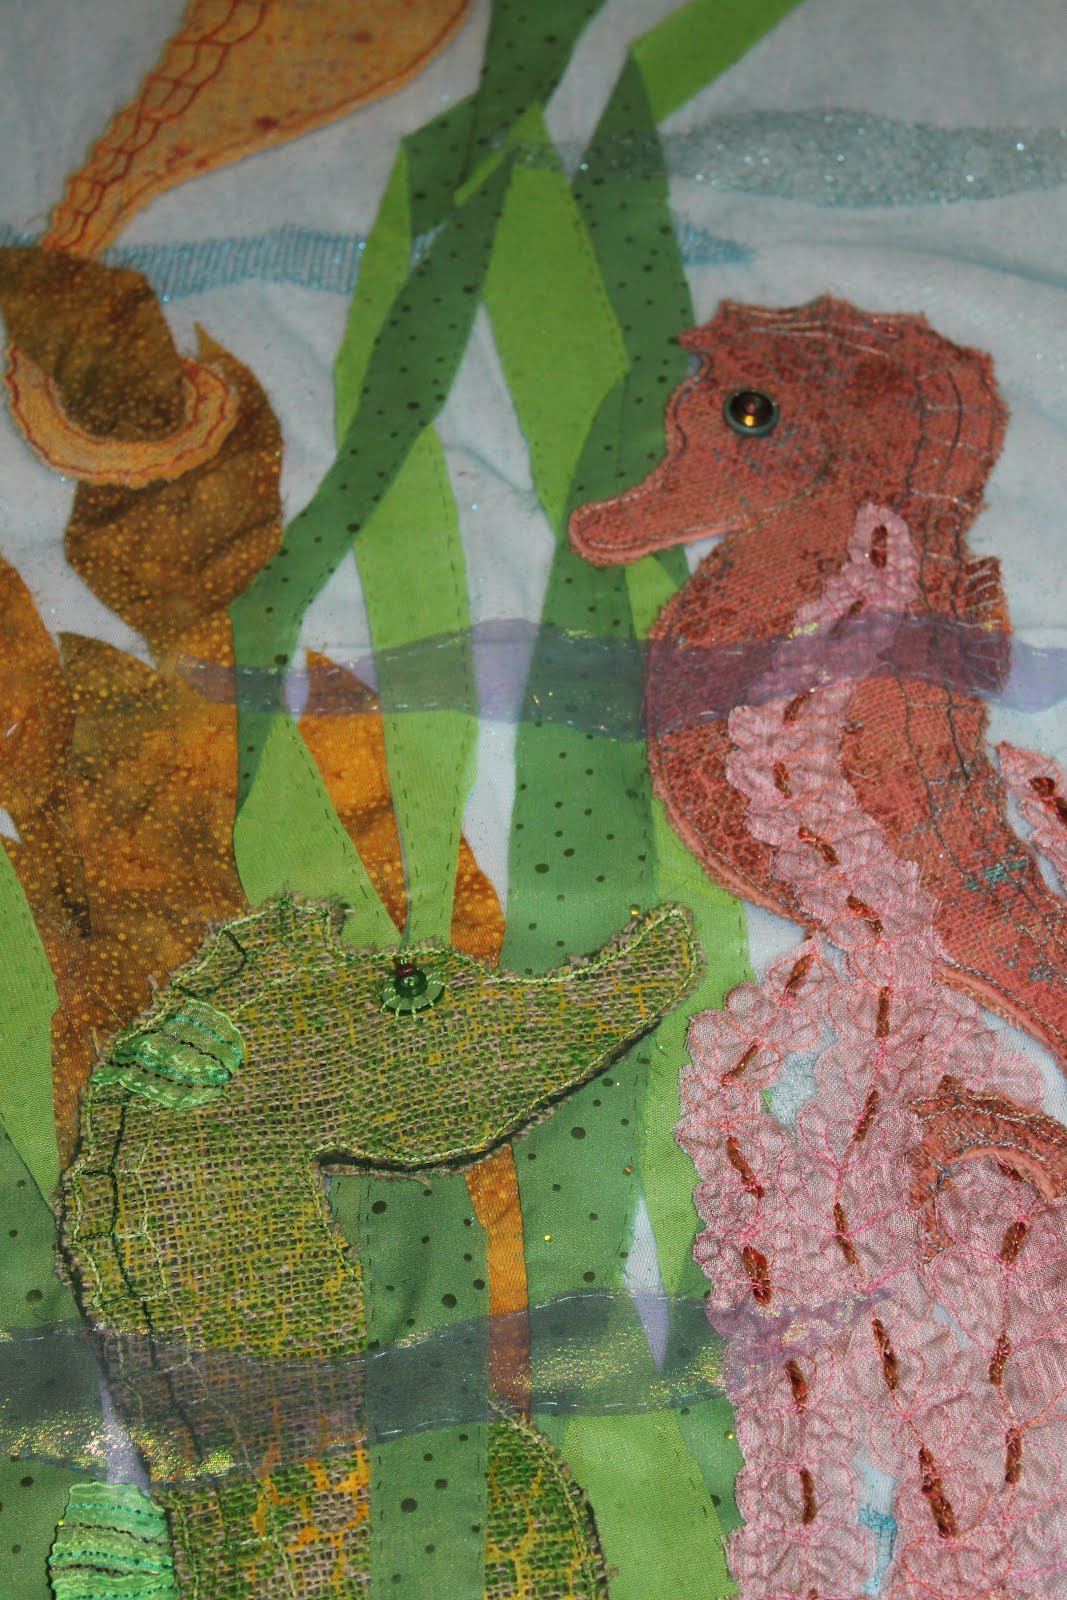
And finally, here is mine, hung in the back corner of the classroom, near the clock.  How do you like the "waves" at the top of the piece?  I used a stick from the backyard to hang it from, to look more natural.  I also tried to create an illusion of depth by layering the sheers and other components.  Unfortunately, it was hung so what I considered the back of the piece was more visible than the front.  On this side, only two of the three seahorses are visible.

I tried to turn it around, below, but it kept rotating back the other way.  It must've made a good enough impression though, because apparently, someone was inquiring about buying it!  That's a good sign!  Will I be able to part with it?  And for how much?
Tune in for more from the NSQG World of Quilts this week!

Friday, April 13, 2012

Not Quite Finished!


Although I've been stitching my little fingers off, this piece is still not quite done! I've discovered that machine stitching on these sheers and knits makes everything wrinkle and pucker, so I'm doing a lot more handstitching than I thought I would and it's very slow going. Here are some in-progress shots. The three seahorses, above . . .
. . . sea anemones I added to the sand below,
. . . a close-up of two seahorses and some sea weeds,
. . . the jelly fish above,
. . . and the top layer of sparkle tulle which I'm now hand-quilting on. After that's done, I'll need to stitch the sides closed somehow (maybe I'll be able to use the machine for that) and then make loops on the top for hanging. We'll show these at the Northern Star Quilter's Guild annual show at John F. Kennedy H. S. in Somers the first weekend in May, so I have another few weeks to complete everything before then.

I needed a break from sewing, so I decided to explore my options for my next charm swap, which has the theme "Feather Your Nest." I couldn't resist this one, especially since I had just made a few bird-themed charms for a necklace for my sister. I thought I would make some more silver nests like the one shown here, but it seems many other charm artists are already doing that.
So today I headed out to see what I might find at the local big-box craft store. I found these cute stamps and played around with them.
Here's the results:
As you can see, I also played around with some polymer clay. It looks like a few other charmers are also making birdhouses, and these took longer than I thought to make (maybe my clay is old and getting stiff? It was hard to work with), so I'm not sure I want to make more of these. I signed up for 2 sets of 15 charms each, so I could do a variety. Right now, the one below is my favorite, made with one of the new stamps and shrink film. I stamped on the shiny side with black StazOn ink and then colored in the bird and the house with permanent markers. I used colored pencil on the rough back side which gives it a little depth. Isn't it cute?
Now the weekend is here, and the weather is supposed to be great, perfect for doing some yard work and other fun outdoor things. Maybe by Monday evening, I'll be ready to get back to my totem... Have a great weekend, everyone!

Saturday, March 31, 2012

Jellyfish Attempt

As you may have guessed from the previous blog post, I was kinda stalling on starting on the jellyfish in my totem, and this was partially because I wasn't sure how to take all the scraps of sheer fabric, yarns and rick-rack shown above and turn it into a jellyfish! I knew I'd probably sandwich two sheers together and somehow get some yarns and other strings to hang down in a squiggly, tentacle-like way between them. But since the background "water" fabric is sheer, I wasn't sure how I was going to secure everything together. When you're stitching onto a solid fabric background, you can just stitch right over any threads to hold them in place. I thought about possibly stitching some yarns onto a white netting, but would I fuse them down first? Pin them? Baste them by hand? Then I remembered that I had some Sulky Solvy water-soluble stabilizer in my stash!
The Solvy is like a thin plastic sheet that can be dissolved in water. I looked through the package instructions and realized you can fuse loose yarns between two pieces of Solvy and then stitch over them to hold them in place!
The stabilizer washes away in only a few minutes in warm water. I did place the yarns on the netting first and then cut most of it away. All in all, I think it's working for me and will make putting this whole totem piece together that much easier! So one jellyfish is done and I've got two more to go...
Some other exciting news: I posted the photo of my stitched button charms (from my previous post) on the Yahoo artcharm website and it was chosen for this week's Homepage picture! Check it out by clicking here!

Thursday, March 29, 2012

Sewing Charms

Despite a busy month at work and striving to make progress on my "totem" project, I couldn't resist joining another charm swap! The theme of this one is sewing - anything that pertains to sewing, including fabric, button, snaps, zippers, safety pins, bobbins, spools etc. It was impossible to pass up! Today I ended up spending most of the day in bed with a head cold (my colleagues at the library were gracious enough to step up and fill in for me) and, being without a good book lately, I had to keep busy in bed somehow! I quickly fused this colorful tweed onto some Timtex and stitched a simple grid over it with the machine. I cut the squares apart, then hand stitched a button on both sides and did a quick whip stitch around the edges. As long as I was hand sewing, I opted to stitch on a jump ring, rather than put in eyelets. They're colorful and fun! I like the way they look all together, springy and bright. I've already completed 14 of the 21 needed, but I needed to rest my hand; My thumb and index finger are getting sore from pulling the needle through the thickness of the Timtex.

While that project is nearly finished, my totem has been languishing on my worktable downstairs. We were away last weekend visiting with family (my sister celebrated a Big Birthday - see a picture of it here) so the focus of my time and energy was elsewhere. I did manage to cut out some fish and pin them onto the sparkle tulle, but I haven't even started on the jellyfish. Maybe this weekend.
Now I'm back to bed for some more rest. Maybe I'll pull out my copy of "The Secret Garden." It's uplifting to read any time of year, but always seems especially pertinent in the spring.

Monday, March 19, 2012

Welcome Spring!

We've been enjoying some beautiful spring weather here in the Northeast, and it's delightful and distracting at the same time! Several times last week, I spent an hour or more in the afternoon outside with the girls and the dog soaking up the fresh air and sunshine. It's great for the spirit, but not so conducive to getting indoor things done!

I am still plodding away at my "totem" piece which is due in early April. I bought a couple of yards of this sheer sparkle tulle when JoAnn's was having "coupon commotion" and knew it would be the base fabric for this piece. It will be viewed from both sides, so I figured the sheer quality would be an asset. I thought I could stitch on some wavey stripes of these other sparkly sheers to create the look of water, but as usual, things don't always go according to my vision. For one thing, the sheers both have so little body, that it's hard to pin them or keep them from shifting and pulling while stitching. I tried fusing one piece with Misty Fuse, but it doesn't stick well to the tulle and it's visible, which I want to avoid.
Since everything will be seen from both sides, choosing matching bobbin thread is important. I chose a metallic thread for the top and put a matching rayon thread in the bobbin, but even with a metallic needle, the top thread was making my life difficult. I ended up switching the positions of the threads, even though I had already wound the rayon thread onto a bobbin. After that, the sheers were easier to work with.
I decided to use three different colors of seaweed to match the three seahorses. I found just enough of this batik in my stash to make three long kelp-like leaves. The batik is also great because it looks the same front and back. I added a little veining with the machine but ended up hand stitching them in place. I'll go over everything with the machine when it's all positioned.
With the beigy-brown-copper seahorse, I had trouble finding a good material for the seaweed. I found this great "vintage" lace ribbon in my stash, which I thought I could dye or paint, but there wasn't enough yardage and I couldn't find it on the internet or anywhere nearby. I've been making a real effort to use what I have, rather than running to the store anyway, more to save time, gas, and storage space than money!
I thought about it for a day or two and ended up going with this sheer fabric that I layered with a coppery tulle and stitched with yarn by hand and with thread by machine. I ended up with a decent looking seaweed-like plant that I think will work for seahorse #2.
Because of the way this piece will be layered, the next things I need to work on are cutting some small fish out of the ribbon below. . .
. . . and making some jellyfish out of the assortment of white sheers, laces, and yarns seen here. Luckily, I just found out I have an extra week to finish this. The days just fly by and I'm lucky if I get an hour or so to work on it daily. I'm kind of glad this is the last big project that I've committed to. I'm starting to feel like I need some down time to just read, lie in the sun, or nap if I need it!

Tuesday, February 28, 2012

Next Steps

It felt like spring today, and even though there are still a few piles of melting snow, things are sprouting up everywhere!
Here's a hyacinth and below, the tulips are beginning to sprout.
The daffodils have already got a few inches of leaf sticking out...
and lo and behold, the first crocus! It's always a thrill to see the first crocus, even though we've had such an easy winter here compared to last year! Apparantly winter is not over yet... the weather men are predicting snow here tomorrow. I've heard reports of anywhere from 1 to 7 inches of snow may fall tomorrow before changing over to rain. It sure would be nice to get a little bonus time at home, especially since tomorrow is Leap Day. Certainly we could all use an extra day to be at home doing what we enjoy most!
Speaking of things I enjoy, here are the next few steps I've taken on the totem project. I completed a yellow seahorse out of the painted burlap I showed in the last post...
... And I painted some green burlap for the third and final seahorse. I used that interesting honeycomb cardboard again, this time in two ways. I bought these moldable stamps almost a year ago and haven't played with them that much. If you heat the surface with a heat gun or iron (cover the foam with parchment first), it will take and keep an imprint until it is reheated. It can be used over and over too - kind of a neat tool to have. After warming it up, I pushed the honeycomb cardboard into it to create that scaley-looking surface, which I then used to apply the green paint. Then I dipped the cardboard in yellow paint to add the hexagonal accents. Should make another nice seahorse!
Although I'm enjoying working on this project, I'm still tempted by the charm supplies. It's not too late for me to sign up for a "springtime in Paris" swap with the yahoo artcharm group. The description reads: "This swap is flirty, feminine & oh-so-French! Colors: pale-to-medium pink, spring or lime green, & black, w/ gunmetal/silver findings. Inspiration: Eiffel tower, vintage French text & maps, floral patterns, fleur de lis, vintage labels, lace & ribbon, French ironwork & architecture." Sounds tempting, doesn't it? I'd only need to make 20 charms... it would be so fun to play with some lacy stamps on shrink film or to get out some pink ribbon and black lace and make some pretty fabric beads... if only I had more TIME!!!