Pages

Showing posts with label sketchbook. Show all posts

Thursday, August 30, 2012

A Room with a View


Here is the view from our balcony at The Water's Edge resort in Wildwood Crest, NJ.  When we were here a few years ago, we learned that this beach is rare in that it grows every year, rather than being eroded.  Apparently, the water used to come up just past those dunes in the foreground, but as you can see, now it is quite a trek out there to the real water's edge.

From our balcony, you can also see the pool and sun deck.  The balcony faces east and it's a great place to start the morning, enjoying the early sun and the view.
 Below is the view to the south where you can see the motel next door.  It is one of the kitchy ones with the plastic palm trees.  Mark & I have really been enjoying the ultra-hip retro architecture and decor on some of the motels from the late 50s and early 60s, known as the "doo-wop" style.  I'll post some more cool photos of those on another post.
Another great thing about this motel's location (besides proximity to the beach) is the sidewalk/promenade that runs right into the famous Wildwood Boardwalk only a short distance away.  In the mornings, lots of people are out jogging or biking, some in these rented surreys that can seat up to six people.  We brought along three bicycles and have managed to get a few rides in here and there.
But mostly, we've been spending time at the beach!  The water is very warm and the waves have been exciting, but not too rough.  We have three boogie boards with us, so the girls can all ride the waves together, and if one of them is out of the water, Mark & I get to have a go.  When we've had enough sun and salt water, we head back to the pool to rinse off, then up to the room for a snack and a nap.  Then it's out to the boardwalk or a restaurant for dinner.  Hard to believe we'll be heading back home tomorrow!  
One other tid-bit for today: Remember the Sketchbook Project I took part in in 2010-11?  One of the guys who runs it contacted me back in June and asked me to put together a tutorial for their blog to explain  how I re-bound my sketchbook using fabric pages.  They just posted it for today's "Tip-Jar Thursday" and you can see it by clicking here.  I didn't have enough photos from my original sketchbook for the tutorial so I had to make a mock-up using materials on hand.  Even, so I think it came out pretty good, considering this is my first real web tutorial.  Take a peek and let me know what you think!

Sunday, January 2, 2011

Happy New Year!

Happy New Year, everyone! I hope you looked back over 2010 with some satisfaction and are beginning to think of goals and aspirations for the 2011. I know I am! And hence the new book in my home library: The Creativity Book: A years worth of inspiration and guidance by Eric Maisel, PhD. I started buying myself books on creativity about 5 years ago when I got The Artist's Way by Julia Cameron and put myself through her whole program. This book is divided into twelve sections, with 8 or so activities per section, so about 2 per week. They are not all your typical artist type of activities; some of them are "forgive yourself for all your failures," "forgive yourself, period," and "forgive others too." Should be interesting. I hope I can sustain it for the whole year.

Meanwhile, I finally had some time to sit down and play with some design possibilities for my sketchbook cover, which has been haunting me (only 2 more weeks!). I really had no idea, no preconceived vision of what I wanted it to look like, so I just went through my stash and pulled out things I like. I started with the plain natural fabric in the foreground and thought I would use that as the base fabric. Then I decided I wanted something with more color and pizzazz. I played around with some prints and batiks and then found my old favorite burlap ( I know, you're probably thinking "why does she like burlap so much?" I don't know - I think it's the texture and it reminds me of very simple times when farming and gardening and homemade clothes were the norm). I made the title (Fabrications) by couching perl cotton onto another fabric with metallic ribbon for the first letter. I stamped some other words and did a little seahorse thread sketch which I colored in with the Inktense pencils. It looked ok, but it seemed too stiff and predictable.


After a lot of trial and error and playing around, here is the final design I came up with. I ended up keeping my favorite robin's egg blue burlap as the base fabric. I decided I wanted it to show, but that it needed something. I stamped a large design onto it using a foam stamp and turquoise metallic acrylic paint. Then I free-motion stitched around the design with copper metallic thread and touched it up with copper acrylic paint, so it almost resembles embossed copper tiles with a patina. I created another seahorse separately on a piece of silk mounted on a piece of printed cotton, using variegated metallic thread. It took me a long time to decide how to add the words: I finally scrapped the previous couched and stamped words and just hand-wrote them with metallic fabric markers on sheer ribbons, then stitched the ribbons into place. It didn't photograph well, but the words say "Fabrications: Fiber art and poetry thru the year by Cindy Green." I'm happy with it, I think it will hold up well to many hands touching it, and I think it is represents me and my style pretty well. Now I just have to finish by stitching it to the original sketchbook cover.

Another step I made towards getting the sketchbook bound and mailed out was putting all the grommets into the fabric pages. A while back I had picked up this grommet kit from the local craft store (I think it sells for about $20 - bring your 40% off coupon!). The most surprising thing about it to me is that IT WORKS! It's actually worth the money! It comes with the main handle component and those interchangeable tips for either punching a hole or flattening the grommet. I think it's intended for paper crafts and scrapbooking, but it did a fantastic job going through the fabrics, some of which were several layers thick. I also used it this fall to put grommets in the tops of the bookmarks I made, to hold the tassel.


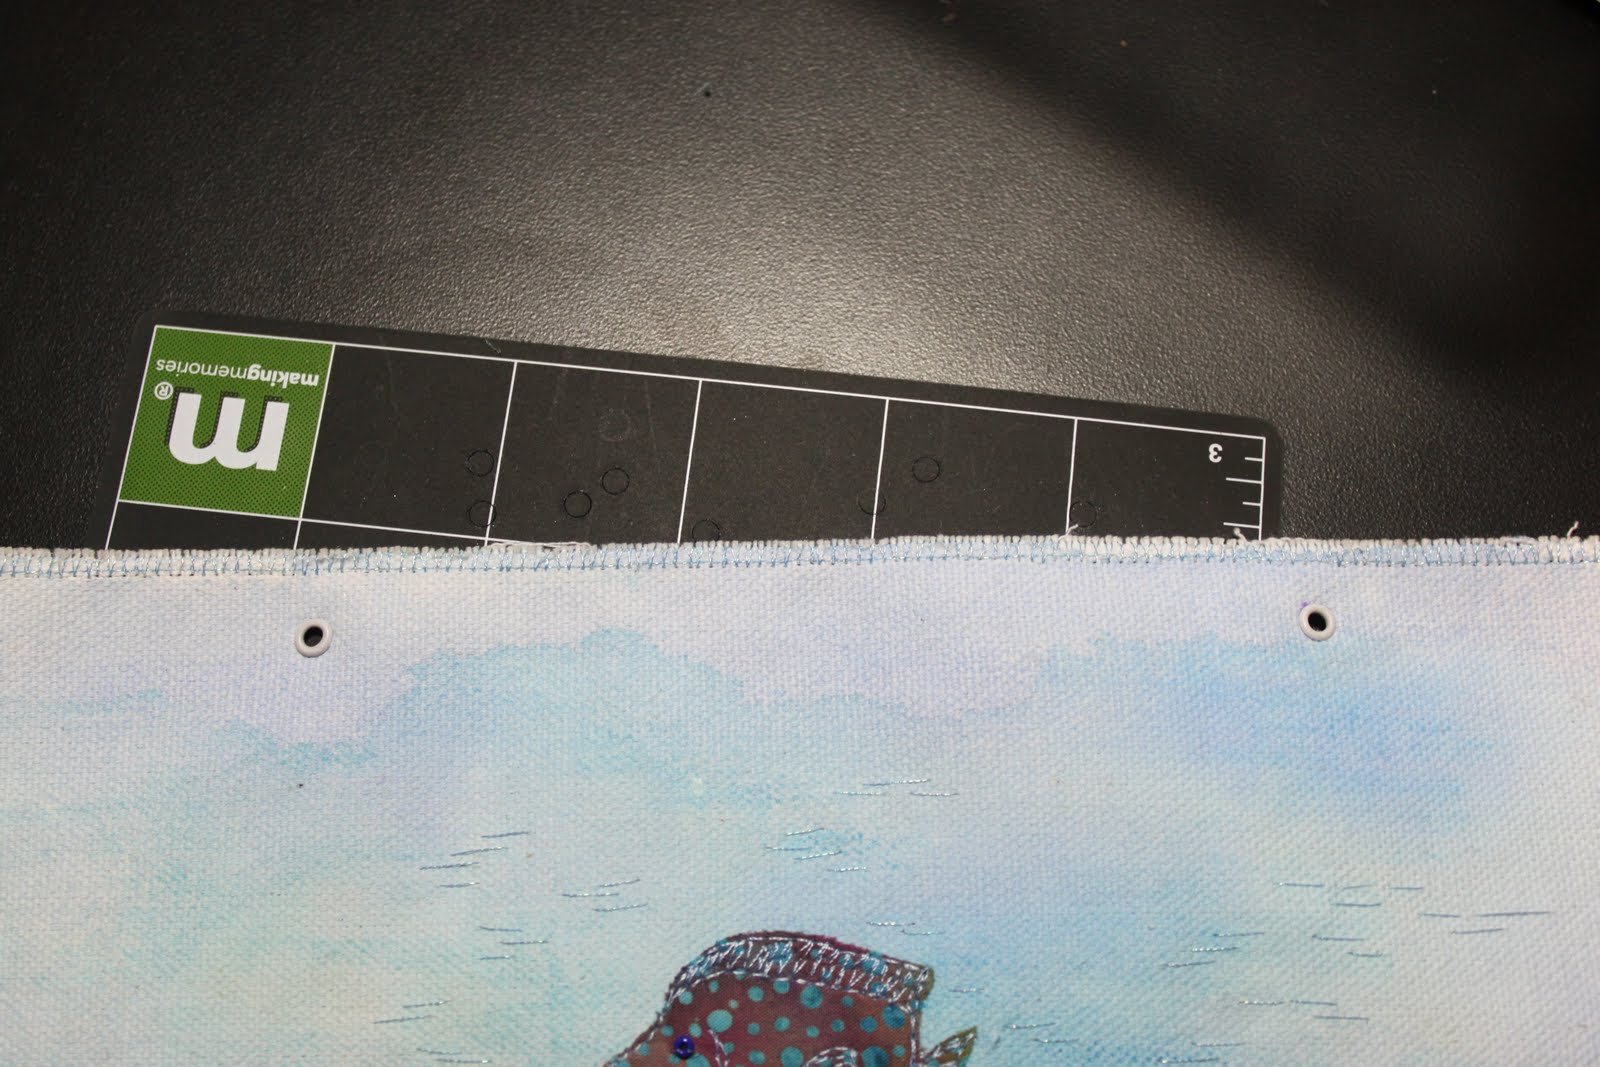
To insert a grommet, first I measured and marked where I wanted it to go. Then, using the black tip, I positioned the punch over the spot and pressed down with the heel of my hand. The handle compresses and then kind of jumps, like it's spring loaded.


Here are two perfectly cut holes where the grommets will go.
Next, I changed to the other tip. I inserted the grommet into the hole from the front to the back, then turned the piece over. Press the end of the tip over the grommet and press down again with the heel of the hand. The spring-loaded action flattens out the back of the grommet, neat and clean!
Here are my two grommets, looking neat and professional! It's nice to have a tool that actually works and does what it claims to do! Now I just have to finish up the stitching on the cover, make one more sketch, and put it all together! Can't wait!

Monday, December 20, 2010

One more down...


...one more to go! Here is another sketch; this one will be last in the sketchbook, for the month of December ( I still have to do February and a cover...). For this one, I started with a piece of white canvas and put glue gel snowflakes and dots, which dried overnight. Then I used ink washes to paint in the blue skies, which came out kind of blotchy which was pretty much the effect I was going for. I washed out the glue and printed the words on Extravorganza, then cut them into hexagonal shapes and fused them in place. I decorated them with hand stitching to look like snowflakes. I also added a bunch of french knots all over, a few houses and evergreen trees, and there it is, my December sketchbook page!

Friday, December 10, 2010

Moving Along

Here are some of the things I crossed off my list this week! First, a sketchbook page for September. It's a photo transfer of a picture I took at Stonecrop Gardens in August (see the original photo by clicking here). I only transferred the flowers, not the background, and I put it on the reverse side of a golden cotton fabric, so it looked faded. I thread painted in only the central flower using rayon thread, and just did outlining on the other flowers and added leaves. I also wrote another quick haiku (I never really got why people like to write haiku until now - it's fun fitting a little vignette into those 14 syllables!) which I stamped on. I wasn't thrilled with it when I was working on it (I find thread painting kind of tedious) but now that it's done, I'm pleased with it.
I also finally got to some baking. I decided some of the gifts I'll be giving this year are home baked cookies, along with either a handmade bookmark or pear ornament. I started with our favorites, these "jewel brooch" cookies (I posted the recipe in 2008 - find it here). They are also a little tedious and time-consuming (I tripled the recipe) but delicious and worth it!

Below is a new recipe I found in the November/December issue of Family Fun magazine. I am one of those people who is just crazy about the flavor of chocolate and mint together, so I had to try these homemade peppermint patties. They aren't baked - you just mix up a stiff dough or paste made mainly of confectioner's sugar, chill it, roll it, cut out shapes (we couldn't find a nice circle so we made these little trees), dip them in melted chocolate, and sprinkle them with crushed candy canes. Kind of a lot of steps, a little messy, but also worth it - they're scrumptious!
Tomorrow we'll get the bulk of the Christmas decorations out of the attic and get the house looking festive. Hopefully we'll have time to bake a few more batches of cookies and watch a few holiday movies too (the girls have never seen "It's a Wonderful Life" in its entirety yet!). How are your holiday plans progressing?

Monday, December 6, 2010

Trying to remain calm...

A week into December and this is my first post of the month! As you may have guessed, the holiday rush is on. Today I left work at noon, munched on a nut bar in the car, and spent about three hours shopping. I got a lot done, and I've also done a lot online, but I got this crazy idea to invite my sisters-in-law and their families for a Christmas get-together on the 19th, so now I have another deadline. This evening I made a list of all the baking, cleaning up, and decorating that still needs to be done in the next two to three weeks, which is why I'm trying to remain calm. What's almost got me panicked is the sketchbook project, which needs to be finished and in the mail on January 15th. I've been working on a "sketch" that's turned into more of a thread painting, so of course it's taking longer than I'd like. And when the nephews come on the 19th, they'll want to play downstairs which is where my work area is, so that needs to be cleaned up - and good! I'd love to have the sketchbook finished and put away by then, but I may have to push it until after Christmas. I hate to leave things for the last minute.
Meanwhile, here are some new ornaments I've been playing with. I used some of the green paper-cloth to create these pears. They might make a nice embellishment on a wrapped gift, so I'll have to make more of them... or some more bookmarks. If only I didn't need to sleep until January...!

Sunday, November 21, 2010

Snowy bookmarks

Even though I already dropped off my bookmarks at the arts council, I keep making more! Maybe these can be given to friends and family for Christmas. I decided to take a step back to working with only fabric for these - no paper or glueing involved. I didn't even use fusible webbing - just layered wavy strips of various white and sheer fabrics in horizontal lines and stitched them all down. The one on the left shows the resulting plain strip. On the next one, I added a stitched tree and a cardinal and hearts from the red paper-cloth. On the third, the tree was made of three pieces of 4-ply yarn held down with free-motion stitching. I also added a red paper-cloth bird. With this technique, there is not as much opportunity to add stamping or writing, since most of it is not natural fibers and won't take the inks well. But maybe they don't need anything more. They do take longer to make than the ones I made last week; they're really individualized and made one at a time.

After I cut those three strips, I realized I had a piece that was just the right size for a sketchbook page. I stitched on another yarn tree and added the cardinal. While I was at it, I trimmed down all the other sketchbook pages to the exact size and restitched the cut edges. In looking through them all, I realized they might correspond to the months of the year. I would have to make another winter page for February, as well as pages for December and September (this one would be the first page in the book - January). I still have almost two months before this needs to be in the mail, so it's quite possible I could complete those. I also realized I really like the few that have words on them. I'm considering writing short poems to go with more of them and adding them onto the page somehow. I also need to decorate the cover and write an artist statement to be included in the book. I think I'm going to attach them to the cover by adding two grommets at the top of each page and putting two rings through them all. The book could still be folded shut and is the same size as the original journal, only thicker. You would open it and then turn the pages up, rather than right to left. I hope that works!

Monday, November 15, 2010

I'm in!

It's hard to believe it's the middle of the month already and it's been a week since my last post. Time is just speeding by, as I attempt to make the most of every hour of every day getting ready for the upcoming holidays, especially since now the Putnam Arts Council will be selling some of my creations at their annual holiday sale! I spent a lot of time putting together more bookmarks and lavender sachets, which need to be dropped off this week. I wanted everything to look professional, so I made up a sign to go with the bookmarks, and I tagged each sachet with my name and contact information (hey, you never know!). So I'm dropping off 15 sachets and 18 bookmarks. I can always make more bookmarks if all of these sell, but I've used up this season's supply of lavender, so that's it for the sachets. If they don't all sell, I'll give some away as gifts. The smell is just divine.


My work area was looking a little chaotic there for a while, with all the many steps to the many projects strewn all over my work table, but since I cleaned up all the lavender fabric, it's been looking a little better, so today I decided to take a break from bookmarks and do another sketchbook page. I got the idea for this way back in July, when I would pass this lovely mimosa tree on my evening walks with Cassie and could smell the scent of the blossoms as I walked by. I wrote the little haiku and took a few photos, which I printed on a laser printer at work and transferred to fabric using the CitraSolv. I like the way they transferred - well enough to tell what they are, but slightly imperfect looking. These were three separate photos that I printed, cut out, and transferred. Then I colored in the background with Inktense pencils, stitched on the mimosa flowers, and stamped on the words. I like it! Now I have 7 or 8 pages for the sketchbook. I wanted to have at least 10, so I hope to make 2 or 3 more, plus a cover, by early January. With the holidays coming up, I hope I can keep my momentum going!

Monday, October 25, 2010

Autumn Sketchbook Page and an experiment

Here is the next page in my sketchbook. I thought about making a smaller version of the conceptual art piece I did for the FANE challenge, but I'd already put away all those scraps and didn't feel like messing up my workspace all over again! Instead, I started going through my stash of fabrics with fusible webbing already adhered to the back, to make a quick fabric collage, and this is what I came up with! I like it much better than the experiments in monoprinting I did yesterday. I always hear about how much fun and what great results other artists get from painting or dyeing their own fabrics, so I've wanted to try this easy technique. I started out by smearing several shades of acrylic paint on a piece of plexiglass and leaving some swirls in the paint with my fingers. I pressed a piece of the sketchbook fabric onto the smeared paint to get the following print.
I felt that one was a little muddy, so I tried again with only 2 shades of blue. Here is that one.
One final attempt with a darker blue. This one was still disappointing to me so I hand painted some purple swirls after I made the print. Still not very inspirational.
So then I tried to "fix" them by doing another monoprint on top of the first one using a different color of paint and a fork to make the texture, rather than my fingers. Here's what they look like now:
Still disappointing, don't you agree? It was fun to try something new and get messy with paint, but I find that the fabrics themselves are what often inspire my work, and these were decidedly NOT inspiring! I may try this technique again, now that I have a little experience with it, but for the most part I think I'll stick to my regular fabric collage!

Wednesday, October 20, 2010

Caribbean Thread Sketch


I haven't started any new projects since I finished the conceptual art piece last week, so I thought I'd squeeze in a page for the sketchbook project. I had already gessoed, textured, and painted the background on this canvas and was trying to decide what to do next. I thought I would do a simple thread sketch, but I seem to have a hard time keeping things simple! I began with the central elkhorn coral, which I sketched all in one continuous line with variegated thread. Then I added the brain coral in the foreground and a piece of purple netting for the fan coral. I decided to tint the first two corals using inktense pencils. Because the entire coral is not filled in and the background color is still very visible, I think it helps make it look more realistically underwater; what do you think? Finally, I added in the fish: a school of small silver fish (we saw clouds of these swimming together on St. John), a yellow-tailed snapper, some small purple fish, and an eel. I also decided to stitch in a spiny urchin. I like the piece in general and it was good for practicing thread sketching and learning how to do effects like showing movement, making something look like it's underwater, and making lines radiating out from a central point. I do enjoy these underwater scenes, don't I?

Thursday, September 16, 2010

Cross Currents


Even though I had a long day, I felt like sitting down and playing with some of my materials tonight. I started with a piece of canvas I had painted with watered down acrylic paints in shades of aqua and turquoise. I laid three strips of an aqua ribbon with an interesting texture across the canvas and noticed the lines the textured ribbon created. I followed those with the sewing machine as I stitched the ribbons on, going back and forth diagonally across the canvas. Then I couched on some wavy yarn in a darker turquoise color. I think I'll call it "Cross Currents: wave theory." I like the way the various stitches and lines cut across each other in an undulating way. It reminds me of the caribbean! And now I have another interesting piece to add to the sketchbook...

Monday, September 13, 2010

Another sketch


Here is my latest fabric sketch. In this one, I experimented with an easy method for doing a batik using Elmer's Glue Gel. I drew a quick sketch, then traced over it onto fabric using the glue gel and a light box. I let the glue dry overnight, and then painted the colors in with watered-down ink. After heat-setting the colors with the iron (on the reverse side and using a parchment pressing sheet), I soaked the cloth to remove the dried glue. Wherever the glue had been was still white. It worked! I finished off the sketch with some free-motion stitching. Although I like the way this came out, if I do this technique again, I would use more glue - more lines and thicker lines. Maybe I'd try an abstract graphic design.
I am enjoying doing these quickie sketches! They don't take a lot of time, fabric, or other resources, yet they're fun, creative, and give me a chance to experiment and try new techniques I've been thinking about. That's probably the whole purpose of a sketchbook, so this is working for me! The fact that the pieces are not layered and quilted doesn't detract from the finished piece at all (I think) and actually makes the whole process easier and quicker. Maybe I've discovered something...

Saturday, September 4, 2010

More Sketchbook Activity

Here are two more pages I created for my sketchbook. The "Spring Songbird Symphony" I started thinking about last spring - I heard all these birds at once and I wanted to recreate the experience, but I wasn't sure how: poetry? music? collage? I finally got the idea to create something that is a combination of the three. I hope it captures the feeling of a spring morning walk.
And now we skip ahead to autumn! I cut a bunch of canvas rectangles to fit into the sketchbook and have been treating the backgrounds in various ways, then stitching, stamping or writing to complete the "sketch." Again, I consider this a sketch because it's not quilted through three layers and it's quick - not too much pondering and critical thinking, just doing it. Here, I put a layer of gesso down on the canvas first, and used a comb-type tool to make a groovy texture before it dried. When it was dry, I added color with the water-soluble crayons and blended them with a brush and my finger. Finally, I stamped on some leaves and stitched on the large one cut from an interesting paper I had in my stash.
Finally, here is my "Facetious" piece. The definition I was working with for facetious was "to treat a serious subject lightly." I chose a serious subject (war) and found some public domain photos on the web. I transferred them to white fabric using the CitraSolv method. Then I chose fabrics and embellishments in light, happy colors and layed everything out like a page in a scrapbook.
Unfortunately, I think the contrast between the serious subject matter and the light, happy colors goes beyond merely being facetious. To me, it borders on inappropriate, insensitive and disrespectful. That certainly was not my intention; I was only trying to be facetious!


Sunday, June 13, 2010

Two New Adventures

This is a photo of the night table next to my bed. It holds my reading lamp, some favorite photos of the girls, and my new sketchbook. I decided to take a flying leap into the unknown and join The Sketchbook Project sponsored by the Art House Co-op in Brooklyn. I have until early January to fill up these 40 pages and send it back. Then it goes on tour around the country, where people attending the exhibit get to pick it up and read it. You get to choose a theme or have one assigned to you. I almost chose "Storybook" but went instead with "This is not a sketchbook." That leaves my options wide open.
I think I was enticed by the idea of having some original pieces being seen by a variety of people (I do wonder who attends these exhibits...). And of course, being a book lover and sometime writer, I had to take a chance at creating something like this. But even though I have six months to fill it up, I am already getting a little frozen at the thought of it. I often hear of how some writers and artists take one look at that blank, white, empty page and freeze at the thought of putting something down, probably because of the pressure of trying to make it perfect. Well, here is a whole bookful of blank white pages staring back at me! And I'm big on re-doing; my eraser and seam ripper are always close at hand. What if I put something down and then hate it? Do I rip out the page?
One thing that is taking the pressure off is that the general rules are really very loose. I could rip out pages if I want. I could even undo the binding, create a complete book out of fabric and and then stitch it back into the cover, if I wanted to. And I'm actually considering doing that.
So what I've been thinking about is, if this is not a sketchbook, as my theme states, then what kind of book is it? It could be a storybook or a picture book, or a book of illustrated poems (like one of my unofficial goals for this year). It could be an ABC book or a dictionary or a journal.
I am mulling this over as I go about my busy life.
I think I'll keep the book on my night table to keep it fresh in my thoughts! And I'll try not to put too much pressure on myself, but keep it fun!
My second new adventure is taking my first e-course with mixed-media artist Kelly Rae Roberts. It's a 5 week course called "Flying Lessons: tips & tricks to help your creative business soar." The flying metaphor goes along with her book, Taking Flight. Although I did get her book from the library about a year ago, I didn't buy it and I didn't do any of the suggested art activities. But I did pick up some good blogs and websites to visit, and there is a lot more of that type of information in the course so far. Her metamorphosis from social worker to full-time professional artist with licensing contracts took only 5 or 6 years. And while she claims anyone can do it and encourages everyone to try, I think there has to be a lot more to it, everything from natural talent, to hard work and dedication, to plain old dumb luck. She seems to have had all of these, as well as all the personal time she needed to dedicate to art, self-exploration and self-expression. My current reality is very different from hers and I don't expect miracles from the course, just maybe a gentle nudge in the right direction. One of the ideas she strongly encourages is having an active presence on Facebook and Twitter. I do have a personal facebook page, but I don't use it much and I have not joined Twitter. I just don't see myself having the kind of time it takes to log on so often to post things (I'm lucky I can leave a few photos and ideas here once or twice a week!). (I think a lot of people do it from their cell phones, but I have one of those good old fashioned phones that I use mainly for emergency calls and the occasional text message!).
So those are my two new adventures, and as I progress through them, I'll keep you posted. For now, I have my constant companion and big yellow shadow keeping me company along the way!